My Learning Curve - Part 1
2 (iii) Equipment - Other

Memory Cards
Specific Thoughts - Watch out for fake cards, especially from cheap internet deals. I have a number of fake SanDisk that work but write speeds are very slow compared to the real thing. I use them for landscape photography where write speed is not an issue.
- Link to aid in Fake CF Card identification
On a seperate note, the following story may be of interest and act as a word of warning. While on holiday a friend took his CF card into an Indian street shop to be downloaded onto a CD in order to free up space on the card for more images. The shopkeeper inserted the card into his reader, turned to his PC and stated that the card was blank. The friend placed the CF card back into his camera to view the pictures that had been there before handing the card to the shopkeeper and all trace of the images had disappeared. My friend now entered into a state of shock, he had travelled a third of the way round the world, spent a great deal of time and money in order to photograph Tigers and had been fortunate enough to spend half an hour watching and photographing close up a female and her two almost fully grown cubs. Nothing we could immediately do seemed to resurrect the images on the CF card. Upon our return to the UK I asked a local PC specialist to help and he was able to retrieve almost all the images from the card using recovery software. Apparently the shopkeepers PC must have been crawling with viruses. I would therefore suggest that you are very careful when abroad and take spare CF cards with you rather than relying on being able to download to CD/DVD as you go.
Digital Sensor Cleaning
Since 2004 I have tried all of the different generic digital sensor cleaning systems currently available in the UK. The safest option is a simple blower but I find this option does not get rid of all particles, many seem to get statically 'stuck' to the sensor, also on more than one occasion when using a blower somehow there were particles in the blower and its use aggravated the situation. I do not wish to name and comment on all the cleaning systems available but I do wish to say that I have found only one system to be successful and the least risk to your very delicate sensor. The brand of the only successful/safe way to clean dust from a sensor that I have found is the Artic Butterfly System.
Yes it is expensive and yes you do feel that you perhaps aren't getting full value for money when you receive the product BUT I believe it is definitely the only way to go in the long run.
I had always felt stressed while cleaning the sensors using the other systems and have damaged 2 sensors on 5D's while using them, and I was being as careful as I possibly could. If I had the sensors replaced it would have cost around £900 per sensor, but luckily the damage occurred on the very edge of each sensor and can be covered up/masked over in Photoshop.
Following those two very stressful events the very thought of sensor cleaning used to send me into a cold sweat until I tried the Artic Butterfly in early 2005. I now have full confidence in this cleaning system for the removal of dust and believe that through extended use it somehow reduces the chance of dust/debris on the sensor in the first place. The only explanation I can think of to explain this is that over time the Artic Butterfly reduces static.
For the removal of smears on the sensor I use the VisibleDust Swabs and their sensor cleaning fluid. Since using the Arctic Butterfly I have only needed to remove one smear on my sensors and that was caused by a contaminated brush, the contamination being aged adhesive from the brush storage packet!
The Arctic Butterfly system consists of a brush (differing sizes for different sensors and other brushes you can use for the chambers, mirror etc.)that have special soft bristles which attract and capture particles. You prepare the brush by spinning it at high RPM using their tool supplied, gently pass the brush across the sensor, repeat if necessary and the job is done. You need to be very careful to look after the brush to keep it free from contamination (especially grease - so no touching with your fingers). I keep mine in the original packaging supplied but following the smear episode above have cut off the adhesive section of the fold over part.
- Link to Great Site Covering All Current Sensor Cleaning Techniques (Recommended and NOT Recommended!)
Gadgets and Accessories
Dedicated Photographic Bags/Rucksacks
Dedicated camera carrying means are a real must in order to protect your valuable equipment and to ensure that you have all the necessary paraphernalia easily at had when photographing.
However they do attract unwanted interest and I often revert to a normal rucksack or day pack to carry my equipment if I feel that there could be a high risk of theft.
If I am not using a pupose designed camera bag I am always very mindful and careful when I put my bag down and add some padding around my camera and always put it inside a heavy duty bin liner/rubble sac and close it with a freezer bag sealing peg. I always, always carry large heavy duty bin liners in all of my bags to cover them up should it rain. I never rely on the bags claimed waterproof properties!
My current line up includes several rucksack type bags and a number of shoulder bags. I have only purchased Lowepro and Tamarac and overall find Lowepro to be slightly ahead of Tamarac in design, functionality and quality of construction, though if you factor in price with Tamarac’s usually a degree less compared to Lowepro then there is little to choose between them.
Good condition second-hand bags from ebay are always worth considering
I have listed our current bags below with my review/thoughts to date. I have not gone into technical details, these are readily available elsewhere.
Lowepro NatureTrekker AW II
This rucksack style camera bag is on the large side, mine usually helps to keep safe two cameras with medium telephoto lenses attached e.g. Canon 5D plus battery grip plus Canon 180mm Macro with1.4*Extender and Canon 40D plus battery grip plus Canon 300mm F4 with 1.4*Extender. There’s still room inside for a converter tube, 2*Extender, some filters and if needed a small zoom or prime of say up to 100mm. The large zip pockets on the inside of the bag have ample room for all the usual odds and ends e.g. spare CF cards, lens cleaning kit, camera instruction manual, spare lens cap. On the outside you can attach a tripod and also add extra Lowepro lens pouches. I usually have one lens pouch added to my bag with a Canon 70-200mm F 2.8 and tripod on the other side. The Rucksack also comes with a useful small Day Pack which can be attached to the front of the Rucksack and can be used to carry any number of items.
As you can probably guess with this size of bag and its day pack its great to be able to pack all that gear in one bag, BUT with all the above it can get close to 25Kg. That may seem OK to carry for 10 minutes or so but you really need to think carefully if you are considering an outing that requires you carry all that weight for a number of hours. Having said that the harness arrangement is super comfortable and can be easily customised to fit.
In summary this is a large well built rucksack with many useful features, but if you pack it to its maximum you really need to be sure you can lug it around.
Lowepro Trekker 600 AW

Image of Lowepro Trekker 600AW alongside Canon 500mm F4 IS, Canon plus 1.4x Extender, mounted on Canon 50D with Battery Grip inside Wildlife Watching Supplies Cover.
This is the only Lowepro bag I am aware of that will accommodate your camera and Canon’s super telephoto lenses (600mm F4, 500 F4 and 400 F2.8).
This bag can be very expensive if you purchase from the UK so I got mine online from a US store and paid duty etc. on import.
This is a no frills rucksack style bag, Again the harness arrangement is super comfortable and it provides excellent protection for your expensive gear. As with the Nature Trekker above there are numerous attachment sites for Lowepro’s lens pouches and the ability to attach a tripod to either the left or right hand side of the bag. It also has a medium/small front outside pocket which is big enough to safely stow a Wimberly Side Kick.
All in all a must have purchase for you big lens.
Andy Rouse Viper Rucksack

Image of Viper Rucksack alongside Canon 500mm F4 IS, Canon plus 1.4x Extender, mounted on Canon 50D with Battery Grip inside Wildlife Watching Supplies Cover.

Image of Viper Rucksack alongisde Lowepro Trekker 600AW.

Image of Andy Rouse Viper Rucksack plus usual contents - Canon 500mm F4 L IS, Canon 1.4x Extenders, Canon 300mm F4 L IS, Extension Tube EF 25 II, Two Canon 50D bodies with Battery Grips, Better Beamer, Cannon 580EX Flash, Canon 70-300mm IS DO (in Lowepro Lens Pouch), Gitzo Carbon Tripod, Wimberley Sidekick, Canon 180mm Macro, Canon Angle Finder C, Spare Batteries and Cards, Kneeling Mat and Gortex camouflage cover for entire bag (extra I have added), pouch of lens cleaning gear - Blower, brush, solution, lens wipes (in compartment).
I was pleased to find someone had produced this large capacity photography rucksack. Before this purchase I'd relied on the Lowepro Trekker 600AW, but in order to carry everything I needed I had to resort to attaching numerous other lens pouches and bags to it. I must have been among one of the first purchasers from Warehouse Express, I purchased it within 5 minutes of receiving a news email from them regarding this product. I still use the Lowepro Trekker 600AW, but only when I know I will only have to use one Camera body and my Canon 500mm F4, for me its is more comfortable than the Viper.
Though pricey I have found the Viper to be extremely useful and would not now be without it.
I would say you have to be very mindful of the weight you are carrying when it is fully loaded. You would have to be very used to trekking with a heavy rucksack to be able to comfortably walk all day with this on your back without frequent resting. For mere mortals like me I find I can cope with it fully loaded for an hour or so, have to rest for 10 minutes and then proceed for another hour. I would rate its comfort of use as average, not as good as some rucksacks but then not as bad as others.
I've Nikwaxed mine to enhance its waterproofing but not yet exposed it to a downpour, though I'm pretty confident it will come through OK.
The kneeling mat is useful and the compartment arrangements work well.
My only negative comment concerns the buckles and strap adjusting mechanisms, they feel very cheap and are not as functionally good as I would expect on such an expensive piece of kit. The makers could certainly learn from the Lowepro equivalents.
In summary - Although it's pricey, until something better comes along, its the best means I've found of carrying securely, safely and reasonably comfortably this amount of gear.
Link to Warehouseexpress for Andy Rouse Viper Rucksack
Tamrac Expedition 4
This is a reasonably small rucksack style bag. It is ideal for one camera, a medium telephoto and a couple of smaller lenses. I use mine as my Landscape kit bag. It easily copes with a Canon 5D, Canon 27-70mm F2.8 and Canon 16-35mm F2.8, Filters, etc. etc. I have attached a separate small bag to this rucksack with my Lee Filters kit. It’s too small to attach a tripod to without feeling a bit stupid.
Its protection level and harness are very good but not quite as good as a comparable Lowepro. I also have an optional extra all weather cover which luckily I have not yet had to use. It has many useful small pockets on the outside and when loaded up is no real problem to carry round for extended periods.

Image of Tamrac Expedition 4 with attached - Lowepro telephoto lens pouch (for Canon 70-200mm F2.8 L IS), small lowepro camera bag attached to the bottom containing Lee Filters and lens cleaning gear, storm jacket for camera and lens, Tamrac waterpoof cover pouch also containing 2 plastic "rubble" sacks. Rubble sacks for added waterproofing and more frequently used as waterproof ground sheets for laying rucksack on and laying Lee filters on while photographing. I am absolutely paranoid about avoiding dirt/grit getting into or onto my gear inthe first place.
Lowepro TLZ AW
This is a large shoulder top loader style bag. Mine is quite an old example, probably purchased 2000 to 2001. This bag is excellent if you just need to carry one camera with medium telephoto lens, spare CF cards, batteries and small lens cleaning kit. It accommodates, but only just, a Canon 30D with battery grip and Canon 100-400mm or Canon 70-200mm F2.8. If you add an extender to the lens then the bag is too small.
This is a good value option and they come up reasonably regularly on ebay. The protection level for your gear is pretty good and the whole arrangement is not much larger than the camera and lens combos noted above. You can add it to any of the Lowepro rucksacks above. You can also attach up to two lens pouches to this bag.
Lowepro Lens Pouches
These are excellent for attaching to the above and keep your precious lenses extremely well protected. They range in size so you need to try and reasonably match each pouch to each lens. The largest pouches will accept Canon lenses up to the 300mm F4 with a 1.4*Extender fitted.
Second-hand pouches come up with reasonable frequency on ebay.
Lowepro Slingshot 300W
I love this bag, though Jackie does not find it comfortable to wear. I would suggest you consider the size choice carefully, the 100W is small. The 300W is large enough for a Canon 30D plus Canon 70-300mm a Canon 100mm Macro and Canon EFS 10-22mm. Plus spare batteries, CF cards, cleaning kit etc and you still have a separate outside ‘Day Pouch’.
It’s an excellent day out/walking around/holiday camera bag and keeps your gear well protected.
Flash Extender Review - Better Beamer

Image of Better Beamer, with camouflage tape, fitted to Canon 580EX on Canon 50D.

Image of Better Beamer
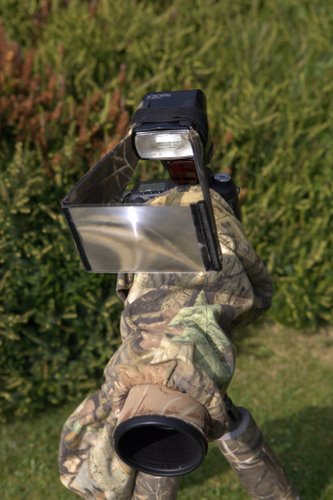
Image of Better Beamer

Image of Better Beamer (folded), Canon 580EX Flash and Better Beamer Lens Pouch.
After much internet research I decided on the purchase of a Flash Extender and found that once you overcome the embarrassment of carrying it around it has significant benefits for wildlife photography. The manufacturer claims that:
“Use of the "Better Beamer" Flash Extender will extend the distance of your flash range. It also allows for faster refresh rates and reduced battery consumption, creating a better chance of catching the action when it happens. It's lightweight, simple to attach with the Velcro strap provided, and conveniently folds flat for packing. "Better Beamer" Flash Extenders are intended for use with focal lengths of 300mm or greater.”
Since the purchase of mine in 2005 it has become an indispensable accessory for all the reasons above I would also add that:
It really is light and pretty robust, if you have room in your bag its no agro to carry around.
I have heard that you have to be careful in bright conditions, if the camera is still for a while and the sunlight is caught just right by the magnifying reflector it can cause burns to your flash or camera. I have only noticed this myself on one occasion to date when it was gently heating an area of the flash unit but spotted it in time.
It really does improve battery consumption, cycle time and flash distance – All significant reasons for purchase from a wildlife point of view. I haven’t been able to test this scientifically but feel it increases distance by at least 50%.
Replacement parts are readily available.
I bought mine from Naturescapes, link below, if you plan to buy one the differing models all produce the same result, they just differ in their attachment design depending on model of flash.
- Link to Luminous-Landscape - Better Beamer Review including some advice on fill flash settings
- Link to Naturescape - US Retailer Stocking Complete Better Beamer Range
Wildlife Watching Supplies - Lens and Camera Covers, Neoprene Lens Covers

Image Canon 500mm F4 L IS and Canon 300mm F4 IS on Canon 50D's with Battery Grips. Both protected by Wildlife Watching Supplies Lens Covers Link To - Wildlife Watching Supplies Lens Covers and Lens Coats Link To - Wildlife Watching Supplies Lens Coats, Neoprene Covers . Plus Protective lens lids for Canon 500mm F4 from Classic Kitchens, I have covered one side in camouflage tape. Link To - Classic Kitchens
I initially improvised these types of covers from all sorts of things - dyed pillow cases, home made bags etc. But have to say I am very happy with these high quality items. I have the double layer versions and they work extremely well.
They not only keep the rain off but offer super dust/dirt protection, act as an extra barrier against abrasion, hide the white of Canon's L lenses and have no glare. A seldom commented bonus which I really like is that they hide you gear from "joe public", greatly reducing the usual boring lens comments. I also really appreciate these covers when I've had to crawl around in the mud to get an image, the thought of all that mud actually on my gear instead of the cover almost brings me out in tears.
I've not yet relied on them being totally waterproof, if the rains turns our to be persistent and there is no obvious chance of a good image my gear goes inside a large black plastic 'rubble sack' for added rain protection.
I also have the neoprene covers, these help to significantly reduce the chances of abrasion damage and camouflage your lens effectively.
Considering the costs of camera bodies and lenses I believe it's foolish not to have some type of camera/lens cover if you inted to use your gear outdoors.
Tripods, Monpods, Beanbags

Gitzo carbon tripod and camouflaged "double" beanbag
For super sharp images I always use a tripod or bean bag. It took quite a bit of discipline to get into this habit and now it feels odd photographing hand held unless its a flight shot. Its probably been the single most important factor in improving my images.
I didn't instantly change from mainly handheld to mainly tripod overnight, I had a weaning period inbetween when I used a monpod for all my shots. I had an aluminium Giotto to start with and this worked very well but was a bit heavy compared to carbon versions. I now have a Gitzo carbon mononpod with a ballhead added and although it doesn't get very regular use, its invaluable when it is used.
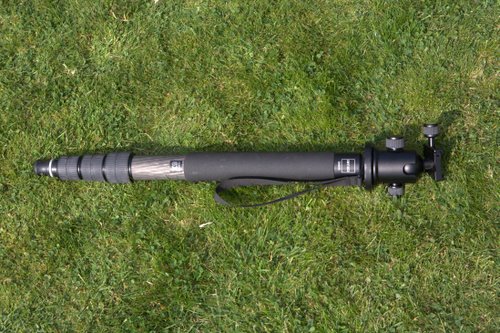
Image of Gitzo carbon tripod and ballhead.

Close-up image of Gitzo carbon monopod with ballhead attached
I started with a budget tripod but found out instantly I'd just wasted my money. I then moved to an aluminium manfortto tripod with trigger ballhead type mounting system. This worked well but could not cope with anything bigger than say a 100mm Telephoto.
When I got my Canon 500mm F4 IS I knew I had to invest in a good tripod in order to do this lens justice. I did a lot of research and eventually decided on a Gitzo Carbon tripod with 3 leg extensions.
The lightness of carbon fibre is a must when it has to be lugged around all day and the stiffness is significantly better than aluminium. I really like the Gitzo quickleg locks and overall its a high quality piece of kit. It really is worth getting as good a tripod as you can, it will last a long time and really does become your best friend if you can discipline yourself to using it.
The bean bag I use the most is a double one which you can rest either side of a vehicle window, its also big enough to use lying down to keep your big lens just out of the mud.
These cheap and easily improvised items are absolutely superb stabilization aids, they really come into their own in awkward stalking places and when photographing from vehicles. I've often improvised them from bags etc. stuffed with whatever is to hand. When travelling you just need to pack the cover then fill it with dried beans, rice or whatever you can find when you reach your destination.
Canon Angle Finder C

Image of Canon Angle Finder C mounted on Canon 50D.

Image of Canon Angle Finder C and case.
This piece of kit doesn't get used very regularly but is extremely useful when needed. It allows you to get low level images easily and comfortably. The viewfinder gives you a corrected upright image and comes with a limited range of magnification settings (1.25x and 2.5x) though I've only really used mine on the 1.25x setting.
Scopac
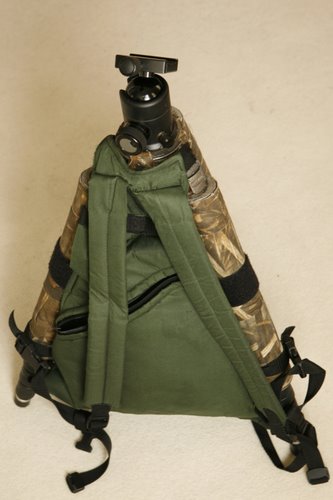
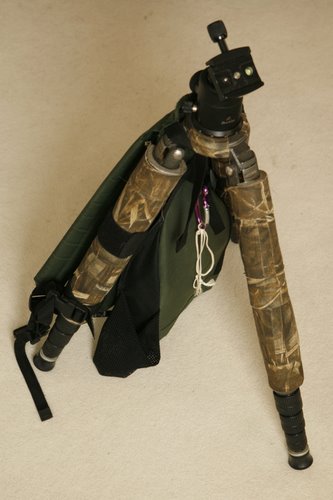
My "Walkabout Base Unit" - Scopac attached to Medium (Series 3) Carbon Gitzo Tripod and Markins Ballhead. To this I add spotting scope and stow binoculars in Scopac for my Birding Kit or Mount Camera and Long Lens (up to 300mm f2.8) and stow lens accessories in the Scopac for my Walkabout Photography Kit.
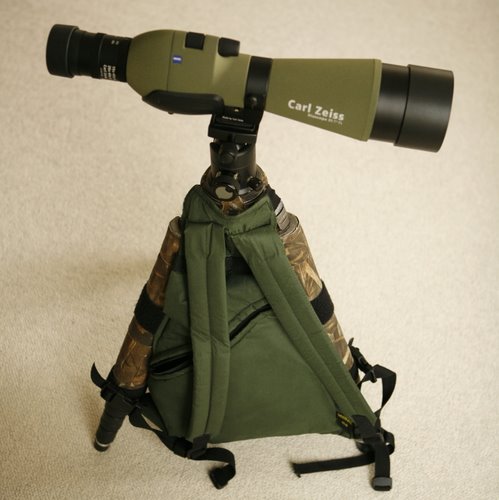
Birding Kit - Spotting Scope usually encased in protective cover with added waterproof cover for transport

Walkabout Photography Kit - Canon 7D plus Battery Grip, Canon EF 300mm f2.8 L IS plus 2x Extender, Wildlife Watching Supplies Protective Coverings. Stowed safely in the Scopac - 1.4x Extender, Canon Extension Tube EF 25 II and Cannon 580EX flash with Better Beamer, Leica 8x20 binoculars and on the outside a drinks bottle.
This has to be one of the most useful bits of kit I own. Its designed for Birders and their spotting scopes but also serves well for us photographers.
I can safely store all the bits and bobs I need for a day's photography (including a drinks bottle!) and it's a real joy to use, making the logging around of gear up to 300mm f2.8 and camera with battery grip a breeze. Once you get the hang of it you can leave the tripod legs partly extended as you trek looking for subjects and the rig can be quickly brought into action for a seated or kneeling shot when required.
The Scopac is 'waterproof' but I've also added a good dosing of Nikwax to mine which I renew annually. I also carry a large heavy duty bin bag to cover the whole rig (stowed in the Scopac) just in case I get caught out for an extended period in heavy rain. Alternatively if I know it really is likely to poor with rain I snap a folded down waterproof poncho to the carabineer I've added, this poncho will cover me and the rig if needed. The poncho is camouflaged so I can also use it as an emergency hide (and waterproof mat against the ground when seated) if required.
Link To - Scopac Site
"Full" Wimberley
Full Wimberley mounted on Gitzo GT5541LS Series 5 Systematic Tripod (insulated foam added to top part of legs and covered in camouflage tape to aid transport of rig over shoulder) with Canon 7D, Battery Grip plus Canon EF 500mm F4 L IS and 1.4x Extender with Wildlife Watching Supplies Protective Coverings
"Full Wimberley" - Mk 1
I ran with a Wimberley Sidekick mounted to a carbon Series 3 Gitzo tripod and Markins Ballhead for a few years but following experiments with spotting scopes and various tripods which illustrated the huge difference a rock solid tripod can make to image quality I decided to invest in a Full Wimberley and Series 5 Gitzo Carbon Tripod.
That's not to say the Sidekick and Series 3 combination wasn't steady (it has enabled me to make many pin sharp images even in difficulty conditions with a 500mm lens plus 1.4 Extender) it's just I was looking for that bit extra as it were.
The Series 5 is steadier than the 3 and the Full Wimberley is a more robust arrangement than the Sidekick and Ballhead so these all add to marginally increased image quality. However some may feel is not worth the extra expense and aggravation. The rig is twice as cumbersome to use and much heavier (compared to the Series 3 rig) so there is a price to pay in terms of practicality. On balance I use this rig for pre-meditated photographic outings when I know exactly how far I need to trek and only my 500mm F4 and 1.4 Extender will be the appropriate lens do the subject justice.
Tweet
Follow @Naturelens
Specific Thoughts - Watch out for fake cards, especially from cheap internet deals. I have a number of fake SanDisk that work but write speeds are very slow compared to the real thing. I use them for landscape photography where write speed is not an issue.
- Link to aid in Fake CF Card identification
On a seperate note, the following story may be of interest and act as a word of warning. While on holiday a friend took his CF card into an Indian street shop to be downloaded onto a CD in order to free up space on the card for more images. The shopkeeper inserted the card into his reader, turned to his PC and stated that the card was blank. The friend placed the CF card back into his camera to view the pictures that had been there before handing the card to the shopkeeper and all trace of the images had disappeared. My friend now entered into a state of shock, he had travelled a third of the way round the world, spent a great deal of time and money in order to photograph Tigers and had been fortunate enough to spend half an hour watching and photographing close up a female and her two almost fully grown cubs. Nothing we could immediately do seemed to resurrect the images on the CF card. Upon our return to the UK I asked a local PC specialist to help and he was able to retrieve almost all the images from the card using recovery software. Apparently the shopkeepers PC must have been crawling with viruses. I would therefore suggest that you are very careful when abroad and take spare CF cards with you rather than relying on being able to download to CD/DVD as you go.
Digital Sensor Cleaning
Since 2004 I have tried all of the different generic digital sensor cleaning systems currently available in the UK. The safest option is a simple blower but I find this option does not get rid of all particles, many seem to get statically 'stuck' to the sensor, also on more than one occasion when using a blower somehow there were particles in the blower and its use aggravated the situation. I do not wish to name and comment on all the cleaning systems available but I do wish to say that I have found only one system to be successful and the least risk to your very delicate sensor. The brand of the only successful/safe way to clean dust from a sensor that I have found is the Artic Butterfly System.
Yes it is expensive and yes you do feel that you perhaps aren't getting full value for money when you receive the product BUT I believe it is definitely the only way to go in the long run.
I had always felt stressed while cleaning the sensors using the other systems and have damaged 2 sensors on 5D's while using them, and I was being as careful as I possibly could. If I had the sensors replaced it would have cost around £900 per sensor, but luckily the damage occurred on the very edge of each sensor and can be covered up/masked over in Photoshop.
Following those two very stressful events the very thought of sensor cleaning used to send me into a cold sweat until I tried the Artic Butterfly in early 2005. I now have full confidence in this cleaning system for the removal of dust and believe that through extended use it somehow reduces the chance of dust/debris on the sensor in the first place. The only explanation I can think of to explain this is that over time the Artic Butterfly reduces static.
For the removal of smears on the sensor I use the VisibleDust Swabs and their sensor cleaning fluid. Since using the Arctic Butterfly I have only needed to remove one smear on my sensors and that was caused by a contaminated brush, the contamination being aged adhesive from the brush storage packet!
The Arctic Butterfly system consists of a brush (differing sizes for different sensors and other brushes you can use for the chambers, mirror etc.)that have special soft bristles which attract and capture particles. You prepare the brush by spinning it at high RPM using their tool supplied, gently pass the brush across the sensor, repeat if necessary and the job is done. You need to be very careful to look after the brush to keep it free from contamination (especially grease - so no touching with your fingers). I keep mine in the original packaging supplied but following the smear episode above have cut off the adhesive section of the fold over part.
- Link to Great Site Covering All Current Sensor Cleaning Techniques (Recommended and NOT Recommended!)
Gadgets and Accessories
Dedicated Photographic Bags/Rucksacks
Dedicated camera carrying means are a real must in order to protect your valuable equipment and to ensure that you have all the necessary paraphernalia easily at had when photographing.
However they do attract unwanted interest and I often revert to a normal rucksack or day pack to carry my equipment if I feel that there could be a high risk of theft.
If I am not using a pupose designed camera bag I am always very mindful and careful when I put my bag down and add some padding around my camera and always put it inside a heavy duty bin liner/rubble sac and close it with a freezer bag sealing peg. I always, always carry large heavy duty bin liners in all of my bags to cover them up should it rain. I never rely on the bags claimed waterproof properties!
My current line up includes several rucksack type bags and a number of shoulder bags. I have only purchased Lowepro and Tamarac and overall find Lowepro to be slightly ahead of Tamarac in design, functionality and quality of construction, though if you factor in price with Tamarac’s usually a degree less compared to Lowepro then there is little to choose between them.
Good condition second-hand bags from ebay are always worth considering
I have listed our current bags below with my review/thoughts to date. I have not gone into technical details, these are readily available elsewhere.
Lowepro NatureTrekker AW II
This rucksack style camera bag is on the large side, mine usually helps to keep safe two cameras with medium telephoto lenses attached e.g. Canon 5D plus battery grip plus Canon 180mm Macro with1.4*Extender and Canon 40D plus battery grip plus Canon 300mm F4 with 1.4*Extender. There’s still room inside for a converter tube, 2*Extender, some filters and if needed a small zoom or prime of say up to 100mm. The large zip pockets on the inside of the bag have ample room for all the usual odds and ends e.g. spare CF cards, lens cleaning kit, camera instruction manual, spare lens cap. On the outside you can attach a tripod and also add extra Lowepro lens pouches. I usually have one lens pouch added to my bag with a Canon 70-200mm F 2.8 and tripod on the other side. The Rucksack also comes with a useful small Day Pack which can be attached to the front of the Rucksack and can be used to carry any number of items.
As you can probably guess with this size of bag and its day pack its great to be able to pack all that gear in one bag, BUT with all the above it can get close to 25Kg. That may seem OK to carry for 10 minutes or so but you really need to think carefully if you are considering an outing that requires you carry all that weight for a number of hours. Having said that the harness arrangement is super comfortable and can be easily customised to fit.
In summary this is a large well built rucksack with many useful features, but if you pack it to its maximum you really need to be sure you can lug it around.
Lowepro Trekker 600 AW
Image of Lowepro Trekker 600AW alongside Canon 500mm F4 IS, Canon plus 1.4x Extender, mounted on Canon 50D with Battery Grip inside Wildlife Watching Supplies Cover.
This is the only Lowepro bag I am aware of that will accommodate your camera and Canon’s super telephoto lenses (600mm F4, 500 F4 and 400 F2.8).
This bag can be very expensive if you purchase from the UK so I got mine online from a US store and paid duty etc. on import.
This is a no frills rucksack style bag, Again the harness arrangement is super comfortable and it provides excellent protection for your expensive gear. As with the Nature Trekker above there are numerous attachment sites for Lowepro’s lens pouches and the ability to attach a tripod to either the left or right hand side of the bag. It also has a medium/small front outside pocket which is big enough to safely stow a Wimberly Side Kick.
All in all a must have purchase for you big lens.
Andy Rouse Viper Rucksack
Image of Viper Rucksack alongside Canon 500mm F4 IS, Canon plus 1.4x Extender, mounted on Canon 50D with Battery Grip inside Wildlife Watching Supplies Cover.
Image of Viper Rucksack alongisde Lowepro Trekker 600AW.
Image of Andy Rouse Viper Rucksack plus usual contents - Canon 500mm F4 L IS, Canon 1.4x Extenders, Canon 300mm F4 L IS, Extension Tube EF 25 II, Two Canon 50D bodies with Battery Grips, Better Beamer, Cannon 580EX Flash, Canon 70-300mm IS DO (in Lowepro Lens Pouch), Gitzo Carbon Tripod, Wimberley Sidekick, Canon 180mm Macro, Canon Angle Finder C, Spare Batteries and Cards, Kneeling Mat and Gortex camouflage cover for entire bag (extra I have added), pouch of lens cleaning gear - Blower, brush, solution, lens wipes (in compartment).
I was pleased to find someone had produced this large capacity photography rucksack. Before this purchase I'd relied on the Lowepro Trekker 600AW, but in order to carry everything I needed I had to resort to attaching numerous other lens pouches and bags to it. I must have been among one of the first purchasers from Warehouse Express, I purchased it within 5 minutes of receiving a news email from them regarding this product. I still use the Lowepro Trekker 600AW, but only when I know I will only have to use one Camera body and my Canon 500mm F4, for me its is more comfortable than the Viper.
Though pricey I have found the Viper to be extremely useful and would not now be without it.
I would say you have to be very mindful of the weight you are carrying when it is fully loaded. You would have to be very used to trekking with a heavy rucksack to be able to comfortably walk all day with this on your back without frequent resting. For mere mortals like me I find I can cope with it fully loaded for an hour or so, have to rest for 10 minutes and then proceed for another hour. I would rate its comfort of use as average, not as good as some rucksacks but then not as bad as others.
I've Nikwaxed mine to enhance its waterproofing but not yet exposed it to a downpour, though I'm pretty confident it will come through OK.
The kneeling mat is useful and the compartment arrangements work well.
My only negative comment concerns the buckles and strap adjusting mechanisms, they feel very cheap and are not as functionally good as I would expect on such an expensive piece of kit. The makers could certainly learn from the Lowepro equivalents.
In summary - Although it's pricey, until something better comes along, its the best means I've found of carrying securely, safely and reasonably comfortably this amount of gear.
Link to Warehouseexpress for Andy Rouse Viper Rucksack
Tamrac Expedition 4
This is a reasonably small rucksack style bag. It is ideal for one camera, a medium telephoto and a couple of smaller lenses. I use mine as my Landscape kit bag. It easily copes with a Canon 5D, Canon 27-70mm F2.8 and Canon 16-35mm F2.8, Filters, etc. etc. I have attached a separate small bag to this rucksack with my Lee Filters kit. It’s too small to attach a tripod to without feeling a bit stupid.
Its protection level and harness are very good but not quite as good as a comparable Lowepro. I also have an optional extra all weather cover which luckily I have not yet had to use. It has many useful small pockets on the outside and when loaded up is no real problem to carry round for extended periods.
Image of Tamrac Expedition 4 with attached - Lowepro telephoto lens pouch (for Canon 70-200mm F2.8 L IS), small lowepro camera bag attached to the bottom containing Lee Filters and lens cleaning gear, storm jacket for camera and lens, Tamrac waterpoof cover pouch also containing 2 plastic "rubble" sacks. Rubble sacks for added waterproofing and more frequently used as waterproof ground sheets for laying rucksack on and laying Lee filters on while photographing. I am absolutely paranoid about avoiding dirt/grit getting into or onto my gear inthe first place.
Lowepro TLZ AW
This is a large shoulder top loader style bag. Mine is quite an old example, probably purchased 2000 to 2001. This bag is excellent if you just need to carry one camera with medium telephoto lens, spare CF cards, batteries and small lens cleaning kit. It accommodates, but only just, a Canon 30D with battery grip and Canon 100-400mm or Canon 70-200mm F2.8. If you add an extender to the lens then the bag is too small.
This is a good value option and they come up reasonably regularly on ebay. The protection level for your gear is pretty good and the whole arrangement is not much larger than the camera and lens combos noted above. You can add it to any of the Lowepro rucksacks above. You can also attach up to two lens pouches to this bag.
Lowepro Lens Pouches
These are excellent for attaching to the above and keep your precious lenses extremely well protected. They range in size so you need to try and reasonably match each pouch to each lens. The largest pouches will accept Canon lenses up to the 300mm F4 with a 1.4*Extender fitted.
Second-hand pouches come up with reasonable frequency on ebay.
Lowepro Slingshot 300W
I love this bag, though Jackie does not find it comfortable to wear. I would suggest you consider the size choice carefully, the 100W is small. The 300W is large enough for a Canon 30D plus Canon 70-300mm a Canon 100mm Macro and Canon EFS 10-22mm. Plus spare batteries, CF cards, cleaning kit etc and you still have a separate outside ‘Day Pouch’.
It’s an excellent day out/walking around/holiday camera bag and keeps your gear well protected.
Flash Extender Review - Better Beamer
Image of Better Beamer, with camouflage tape, fitted to Canon 580EX on Canon 50D.
Image of Better Beamer
Image of Better Beamer
Image of Better Beamer (folded), Canon 580EX Flash and Better Beamer Lens Pouch.
After much internet research I decided on the purchase of a Flash Extender and found that once you overcome the embarrassment of carrying it around it has significant benefits for wildlife photography. The manufacturer claims that:
“Use of the "Better Beamer" Flash Extender will extend the distance of your flash range. It also allows for faster refresh rates and reduced battery consumption, creating a better chance of catching the action when it happens. It's lightweight, simple to attach with the Velcro strap provided, and conveniently folds flat for packing. "Better Beamer" Flash Extenders are intended for use with focal lengths of 300mm or greater.”
Since the purchase of mine in 2005 it has become an indispensable accessory for all the reasons above I would also add that:
It really is light and pretty robust, if you have room in your bag its no agro to carry around.
I have heard that you have to be careful in bright conditions, if the camera is still for a while and the sunlight is caught just right by the magnifying reflector it can cause burns to your flash or camera. I have only noticed this myself on one occasion to date when it was gently heating an area of the flash unit but spotted it in time.
It really does improve battery consumption, cycle time and flash distance – All significant reasons for purchase from a wildlife point of view. I haven’t been able to test this scientifically but feel it increases distance by at least 50%.
Replacement parts are readily available.
I bought mine from Naturescapes, link below, if you plan to buy one the differing models all produce the same result, they just differ in their attachment design depending on model of flash.
- Link to Luminous-Landscape - Better Beamer Review including some advice on fill flash settings
- Link to Naturescape - US Retailer Stocking Complete Better Beamer Range
Wildlife Watching Supplies - Lens and Camera Covers, Neoprene Lens Covers
Image Canon 500mm F4 L IS and Canon 300mm F4 IS on Canon 50D's with Battery Grips. Both protected by Wildlife Watching Supplies Lens Covers Link To - Wildlife Watching Supplies Lens Covers and Lens Coats Link To - Wildlife Watching Supplies Lens Coats, Neoprene Covers . Plus Protective lens lids for Canon 500mm F4 from Classic Kitchens, I have covered one side in camouflage tape. Link To - Classic Kitchens
I initially improvised these types of covers from all sorts of things - dyed pillow cases, home made bags etc. But have to say I am very happy with these high quality items. I have the double layer versions and they work extremely well.
They not only keep the rain off but offer super dust/dirt protection, act as an extra barrier against abrasion, hide the white of Canon's L lenses and have no glare. A seldom commented bonus which I really like is that they hide you gear from "joe public", greatly reducing the usual boring lens comments. I also really appreciate these covers when I've had to crawl around in the mud to get an image, the thought of all that mud actually on my gear instead of the cover almost brings me out in tears.
I've not yet relied on them being totally waterproof, if the rains turns our to be persistent and there is no obvious chance of a good image my gear goes inside a large black plastic 'rubble sack' for added rain protection.
I also have the neoprene covers, these help to significantly reduce the chances of abrasion damage and camouflage your lens effectively.
Considering the costs of camera bodies and lenses I believe it's foolish not to have some type of camera/lens cover if you inted to use your gear outdoors.
Tripods, Monpods, Beanbags
Gitzo carbon tripod and camouflaged "double" beanbag
For super sharp images I always use a tripod or bean bag. It took quite a bit of discipline to get into this habit and now it feels odd photographing hand held unless its a flight shot. Its probably been the single most important factor in improving my images.
I didn't instantly change from mainly handheld to mainly tripod overnight, I had a weaning period inbetween when I used a monpod for all my shots. I had an aluminium Giotto to start with and this worked very well but was a bit heavy compared to carbon versions. I now have a Gitzo carbon mononpod with a ballhead added and although it doesn't get very regular use, its invaluable when it is used.
Image of Gitzo carbon tripod and ballhead.
Close-up image of Gitzo carbon monopod with ballhead attached
I started with a budget tripod but found out instantly I'd just wasted my money. I then moved to an aluminium manfortto tripod with trigger ballhead type mounting system. This worked well but could not cope with anything bigger than say a 100mm Telephoto.
When I got my Canon 500mm F4 IS I knew I had to invest in a good tripod in order to do this lens justice. I did a lot of research and eventually decided on a Gitzo Carbon tripod with 3 leg extensions.
The lightness of carbon fibre is a must when it has to be lugged around all day and the stiffness is significantly better than aluminium. I really like the Gitzo quickleg locks and overall its a high quality piece of kit. It really is worth getting as good a tripod as you can, it will last a long time and really does become your best friend if you can discipline yourself to using it.
The bean bag I use the most is a double one which you can rest either side of a vehicle window, its also big enough to use lying down to keep your big lens just out of the mud.
These cheap and easily improvised items are absolutely superb stabilization aids, they really come into their own in awkward stalking places and when photographing from vehicles. I've often improvised them from bags etc. stuffed with whatever is to hand. When travelling you just need to pack the cover then fill it with dried beans, rice or whatever you can find when you reach your destination.
Canon Angle Finder C
Image of Canon Angle Finder C mounted on Canon 50D.
Image of Canon Angle Finder C and case.
This piece of kit doesn't get used very regularly but is extremely useful when needed. It allows you to get low level images easily and comfortably. The viewfinder gives you a corrected upright image and comes with a limited range of magnification settings (1.25x and 2.5x) though I've only really used mine on the 1.25x setting.
Scopac
My "Walkabout Base Unit" - Scopac attached to Medium (Series 3) Carbon Gitzo Tripod and Markins Ballhead. To this I add spotting scope and stow binoculars in Scopac for my Birding Kit or Mount Camera and Long Lens (up to 300mm f2.8) and stow lens accessories in the Scopac for my Walkabout Photography Kit.
Birding Kit - Spotting Scope usually encased in protective cover with added waterproof cover for transport
Walkabout Photography Kit - Canon 7D plus Battery Grip, Canon EF 300mm f2.8 L IS plus 2x Extender, Wildlife Watching Supplies Protective Coverings. Stowed safely in the Scopac - 1.4x Extender, Canon Extension Tube EF 25 II and Cannon 580EX flash with Better Beamer, Leica 8x20 binoculars and on the outside a drinks bottle.
This has to be one of the most useful bits of kit I own. Its designed for Birders and their spotting scopes but also serves well for us photographers.
I can safely store all the bits and bobs I need for a day's photography (including a drinks bottle!) and it's a real joy to use, making the logging around of gear up to 300mm f2.8 and camera with battery grip a breeze. Once you get the hang of it you can leave the tripod legs partly extended as you trek looking for subjects and the rig can be quickly brought into action for a seated or kneeling shot when required.
The Scopac is 'waterproof' but I've also added a good dosing of Nikwax to mine which I renew annually. I also carry a large heavy duty bin bag to cover the whole rig (stowed in the Scopac) just in case I get caught out for an extended period in heavy rain. Alternatively if I know it really is likely to poor with rain I snap a folded down waterproof poncho to the carabineer I've added, this poncho will cover me and the rig if needed. The poncho is camouflaged so I can also use it as an emergency hide (and waterproof mat against the ground when seated) if required.
Link To - Scopac Site
"Full" Wimberley
Full Wimberley mounted on Gitzo GT5541LS Series 5 Systematic Tripod (insulated foam added to top part of legs and covered in camouflage tape to aid transport of rig over shoulder) with Canon 7D, Battery Grip plus Canon EF 500mm F4 L IS and 1.4x Extender with Wildlife Watching Supplies Protective Coverings
"Full Wimberley" - Mk 1
I ran with a Wimberley Sidekick mounted to a carbon Series 3 Gitzo tripod and Markins Ballhead for a few years but following experiments with spotting scopes and various tripods which illustrated the huge difference a rock solid tripod can make to image quality I decided to invest in a Full Wimberley and Series 5 Gitzo Carbon Tripod.
That's not to say the Sidekick and Series 3 combination wasn't steady (it has enabled me to make many pin sharp images even in difficulty conditions with a 500mm lens plus 1.4 Extender) it's just I was looking for that bit extra as it were.
The Series 5 is steadier than the 3 and the Full Wimberley is a more robust arrangement than the Sidekick and Ballhead so these all add to marginally increased image quality. However some may feel is not worth the extra expense and aggravation. The rig is twice as cumbersome to use and much heavier (compared to the Series 3 rig) so there is a price to pay in terms of practicality. On balance I use this rig for pre-meditated photographic outings when I know exactly how far I need to trek and only my 500mm F4 and 1.4 Extender will be the appropriate lens do the subject justice.
Tweet
Follow @Naturelens